Photoshop Text Effects #3: Creating Multiple Outlines

Welcome to the third part of our Photoshop Text Effects tutorial series. In parts 1 and 2, we explored the text tools and settings available in Adobe Photoshop, and how to use them. If you haven’t already, check out those posts below.
Photoshop Text Effects #1
In the first of the series, we looked at Photoshop’s various text controls and settings, and how to apply them. We also explored the warp text option and character styles menu. Be sure to check out this article for an introduction to using text in Photoshop.
Photoshop Text Effects #2
Here we explored the various layer styles which can be applied to enhance and adjust our text. We looked into the effects we can achieve by just applying a simple adjustment to our layer. We’d advise taking a look at this article if you’d like a more comprehensive view of what each layer style option does.
As we’ve explored the basic tools and settings which we can use to enhance and adjust our text in Photoshop, now we’ll learn how to use this knowledge to create cool effects. By the end of this series, you should be able to confidently apply these techniques to create various different designs and styles of wording, from the simple but effective, to slightly more advanced.
Table of content
In this article, we’re going to start out very basic and simply use the stroke tool, within the layer effects menu, to create multiple outlines around a piece of text.
How to create multiple outlines with fonts in Photoshop
So, let’s get started! Our first step is to create a new canvas. Tap new within Photoshop and in the preset details section, set your width to 2000 pixels and height to 1200 pixels. We can leave the resolution as it’s default, as this is only used for printing out.
Change the background contents drop down menu to white. All other settings can be left as they are.
Tap create, in the bottom right hand corner.

You’ll now see a blank canvas appear on the screen.
Tap on the text tool on the left hand side menu (the icon which looks like a capital T) and use the options along the top of the screen to select your font. As we’re going to add outlines to the wording, you ideally want something bulky and simple – try to avoid cursive or fancy fonts here or the effect won’t look as good.
I’m going to use the Pineapple font which you can download from Creative Fabrica.
Once you’ve selected the text tool, choose a colour (preferably a dark shade, or black), and then click the middle of your canvas and write your chosen wording.

Your text will most likely be quite small, so we need to make this a little bigger.
Tap on the transform tool which is on the left hand side menu; the button looks like a cross with arrows on each edge.

Use the tiny squares on each corner of your text to drag it to your desired size. Don’t make it too big, as we need to leave space on the canvas to add our outlines.
Tip: to maintain scale when using free transform, hold down the shift key whilst dragging the edges of your element. This way, it won’t distort and will keep it’s original ratio.

Another way in which you can apply the free transform tool is to select edit from the menu along the top of your screen, and then select free transform. You can also use command and T if you’re using an Apple computer.

Once you’re happy with the font, size and colour of your text, go over to the layers menu and along the bottom of this box, select the layer styles button – the one which looks like fx.

Tap on the fx, and then select stroke.

Don’t forget to check out Photoshop Text Effects #2 for an overview of what each of these adjustments does!
You should now see the layer style menu appear, with the stroke option already selected.

You’ll see various options in this menu, however, the stroke layer style is the best one to begin with as it’s the most straight forward (and probably the most useful!).
First you will see size, which controls the size of the stroke – basically how thick the outline is.
You’ll then see position, which determines where in the text we want to apply our stroke. Blend mode is where we can adjust the style of the application, and opacity is where we’re able to choose how transparent the stroke will be.
You can then choose your colour in the last menu, by tapping on the coloured box.

The colour chooser should now pop up. Select the colour of your first outline – this will be the one directly outside of your main text.

Back in the stroke menu, change the size to 5 px and leave all other settings as the default; they should match the below.

Tap ok, and you’ll now see that you have your first outline!

Tap on the fx button again – within the layers menu – and then select stroke. You should see along the left hand side, that stroke is highlighted, with a + sign next to it. Tap on the +.

You’ll now see that the stroke menu has duplicated!

Tap on the newest stroke menu, which should be the bottom one. If it’s not, you can use the up and down arrows in the bottom left hand corner to reorder the list.

In this menu, select the colour which you want your second outline to be. Leave all other options the same, apart from the size. Change this up to 10 px.
To see our strokes added to the outside, we need to make them bigger so that they show around the inner ones. We’re going to go up in increments of 5, but once you get the hang of it, you can make the outlines as big or small as you want.

Now, we can see our original text alongside two outlines.

Add a new stroke, and select your next colour alongside changing the size up to 15 px.

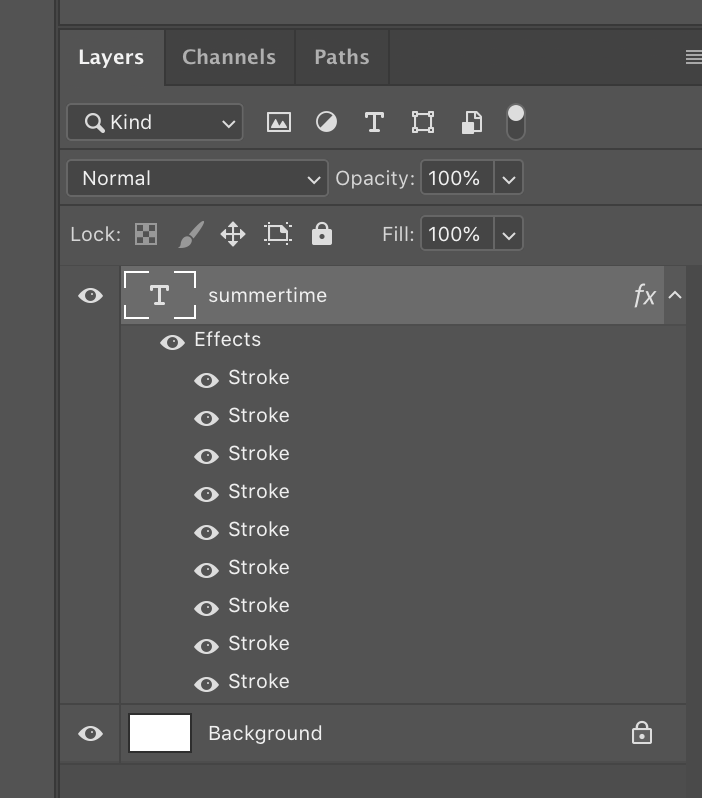
Repeat this step as many times as you want until you’re happy with your outlines. You’ll see that each separate stroke that you’ve added, is listed under the layer.
If you want to delete one of the outlines, open the layer adjustments menu and highlight the stroke, and tap on the bin icon next to the arrows.

We’re all done! We hope that you found this tutorial useful, stay tuned and next time we’ll look at another cool text effect for Photoshop.

Artículo escrito por