3 Different Crafts You Can Make with Glass Jars

Mason jars, jam jars, even pasta sauce jars – whatever you want to call them, and however you find them, glass jars are something that we all have in the house at one time or another. There are countless creative things you can do with them, but for now let’s take a look at three. These glass jar craft projects are really fun to make, and surprisingly easy!
Fairy Lantern Jar

This gorgeous glowing fairy jar looks complicated to make, but it is actually deceptively simple!
What you will need:
- One glass jar
- White tissue paper
- White glitter (biodegradable if you can get it!)
- A fairy cut-out on black card, carefully measured to ensure it fits your jar
- Jute twine
- PVA glue, Mod Podge, or similar
- A brush to apply the above glue (a foam brush may work best)
- An electric, battery-powered tealight (DO NOT use a real candle for this project!)
- Fast-drying glue
- (Optional) Additional decorations like small artificial flowers or berries
- (Optional) Hot glue gun
The first thing you want to do is attach your fairy cut-out to the inside of the front of your jar. It’s best to use a fast-drying glue if you can, because it’s more difficult to adjust from the inside of the jar. If your jar has any embossing on it, make sure you use a side that is plain and smooth to attach your fairy.

I got my fairy silhouette design from this collection by curutdesign on Creative Fabrica and cut it out on a Cricut Maker. If you do not have a cutting machine, you may be able to purchase ready-made cut-outs online or from a craft shop.

Once your fairy is securely glued to the inside, use your glue of choice from the list above to cover the jar (up to the neck) and stick the white tissue paper all over the outside of it. Try to avoid air bubbles and folds as much as you can to ensure good coverage of the jar (and visibility of the fairy inside) but it’s okay if there are a few.

Allow this to dry, and reapply glue to any parts that don’t stick down properly if needed. Once dry, use your glue again to apply glitter to the outer edges of the jar. You can also use glitter glue in a pinch! Try to avoid covering the fairy with glitter, as it is quite opaque when dry and will limit the visibility of the design.

Next, you can start adding decorations like the jute twine and any artificial flowers, berries, etc. that you want. You can secure these with hot glue if you wish, for a super secure decoration that won’t budge.
When you have finished decorating the jar, you can turn on the electric tealight and place it inside. Voilà – your very own magical fairy jar!

Heart Silhouette Jar

This super easy craft turns a simple glass jar into a cute decorative piece, party favour, or storage container. For this tutorial, we are using a heart shape and a navy blue paint, but you can use any shape and any colour – the only limit is your imagination!
What you will need:
- One glass jar
- Navy blue acrylic paint
- Removable vinyl (any colour)
- Scissors or a cutting machine to cut the vinyl
- A brush to apply the acrylic paint
- (Optional) Ribbon or jute twine
- (Optional) Rubbing alcohol
First, cut your removable vinyl into the shape of a heart using your cutting machine or scissors. If you are using scissors, take extra care when cutting out your design.

Before applying the vinyl, you may want to clean the surface of the jar with some rubbing alcohol. Gently apply it with some kitchen roll/paper towel, and leave it for a minute or so to completely dry off.

Then, carefully line up and apply the vinyl to the front of your jar. Like the fairy jar project, you’ll want to use a plain, smooth side with no embossing. Using your fingers or a burnishing tool, make sure that the vinyl is flat against the glass, eliminating air bubbles as much as possible.

Next, cover the whole jar with the navy blue acrylic paint. You will need to apply 2-3 coats, so just make sure you let it dry in between. You don’t need to cover the vinyl, but just make sure your paint meets all its edges closely for a crisp, clean image.

Once you’re happy with the coverage of the paint and you have left it to dry, carefully peel off your removable vinyl. Be careful not to pull off any of the acrylic paint around the edges with it!
You will be left with a see-through window in the shape of your vinyl image, so you’ll be able to see whatever you put inside the jar – whether that is sweets, pens, or even a terrarium! In this case, it makes a nice little storage jar for some acrylic paints.
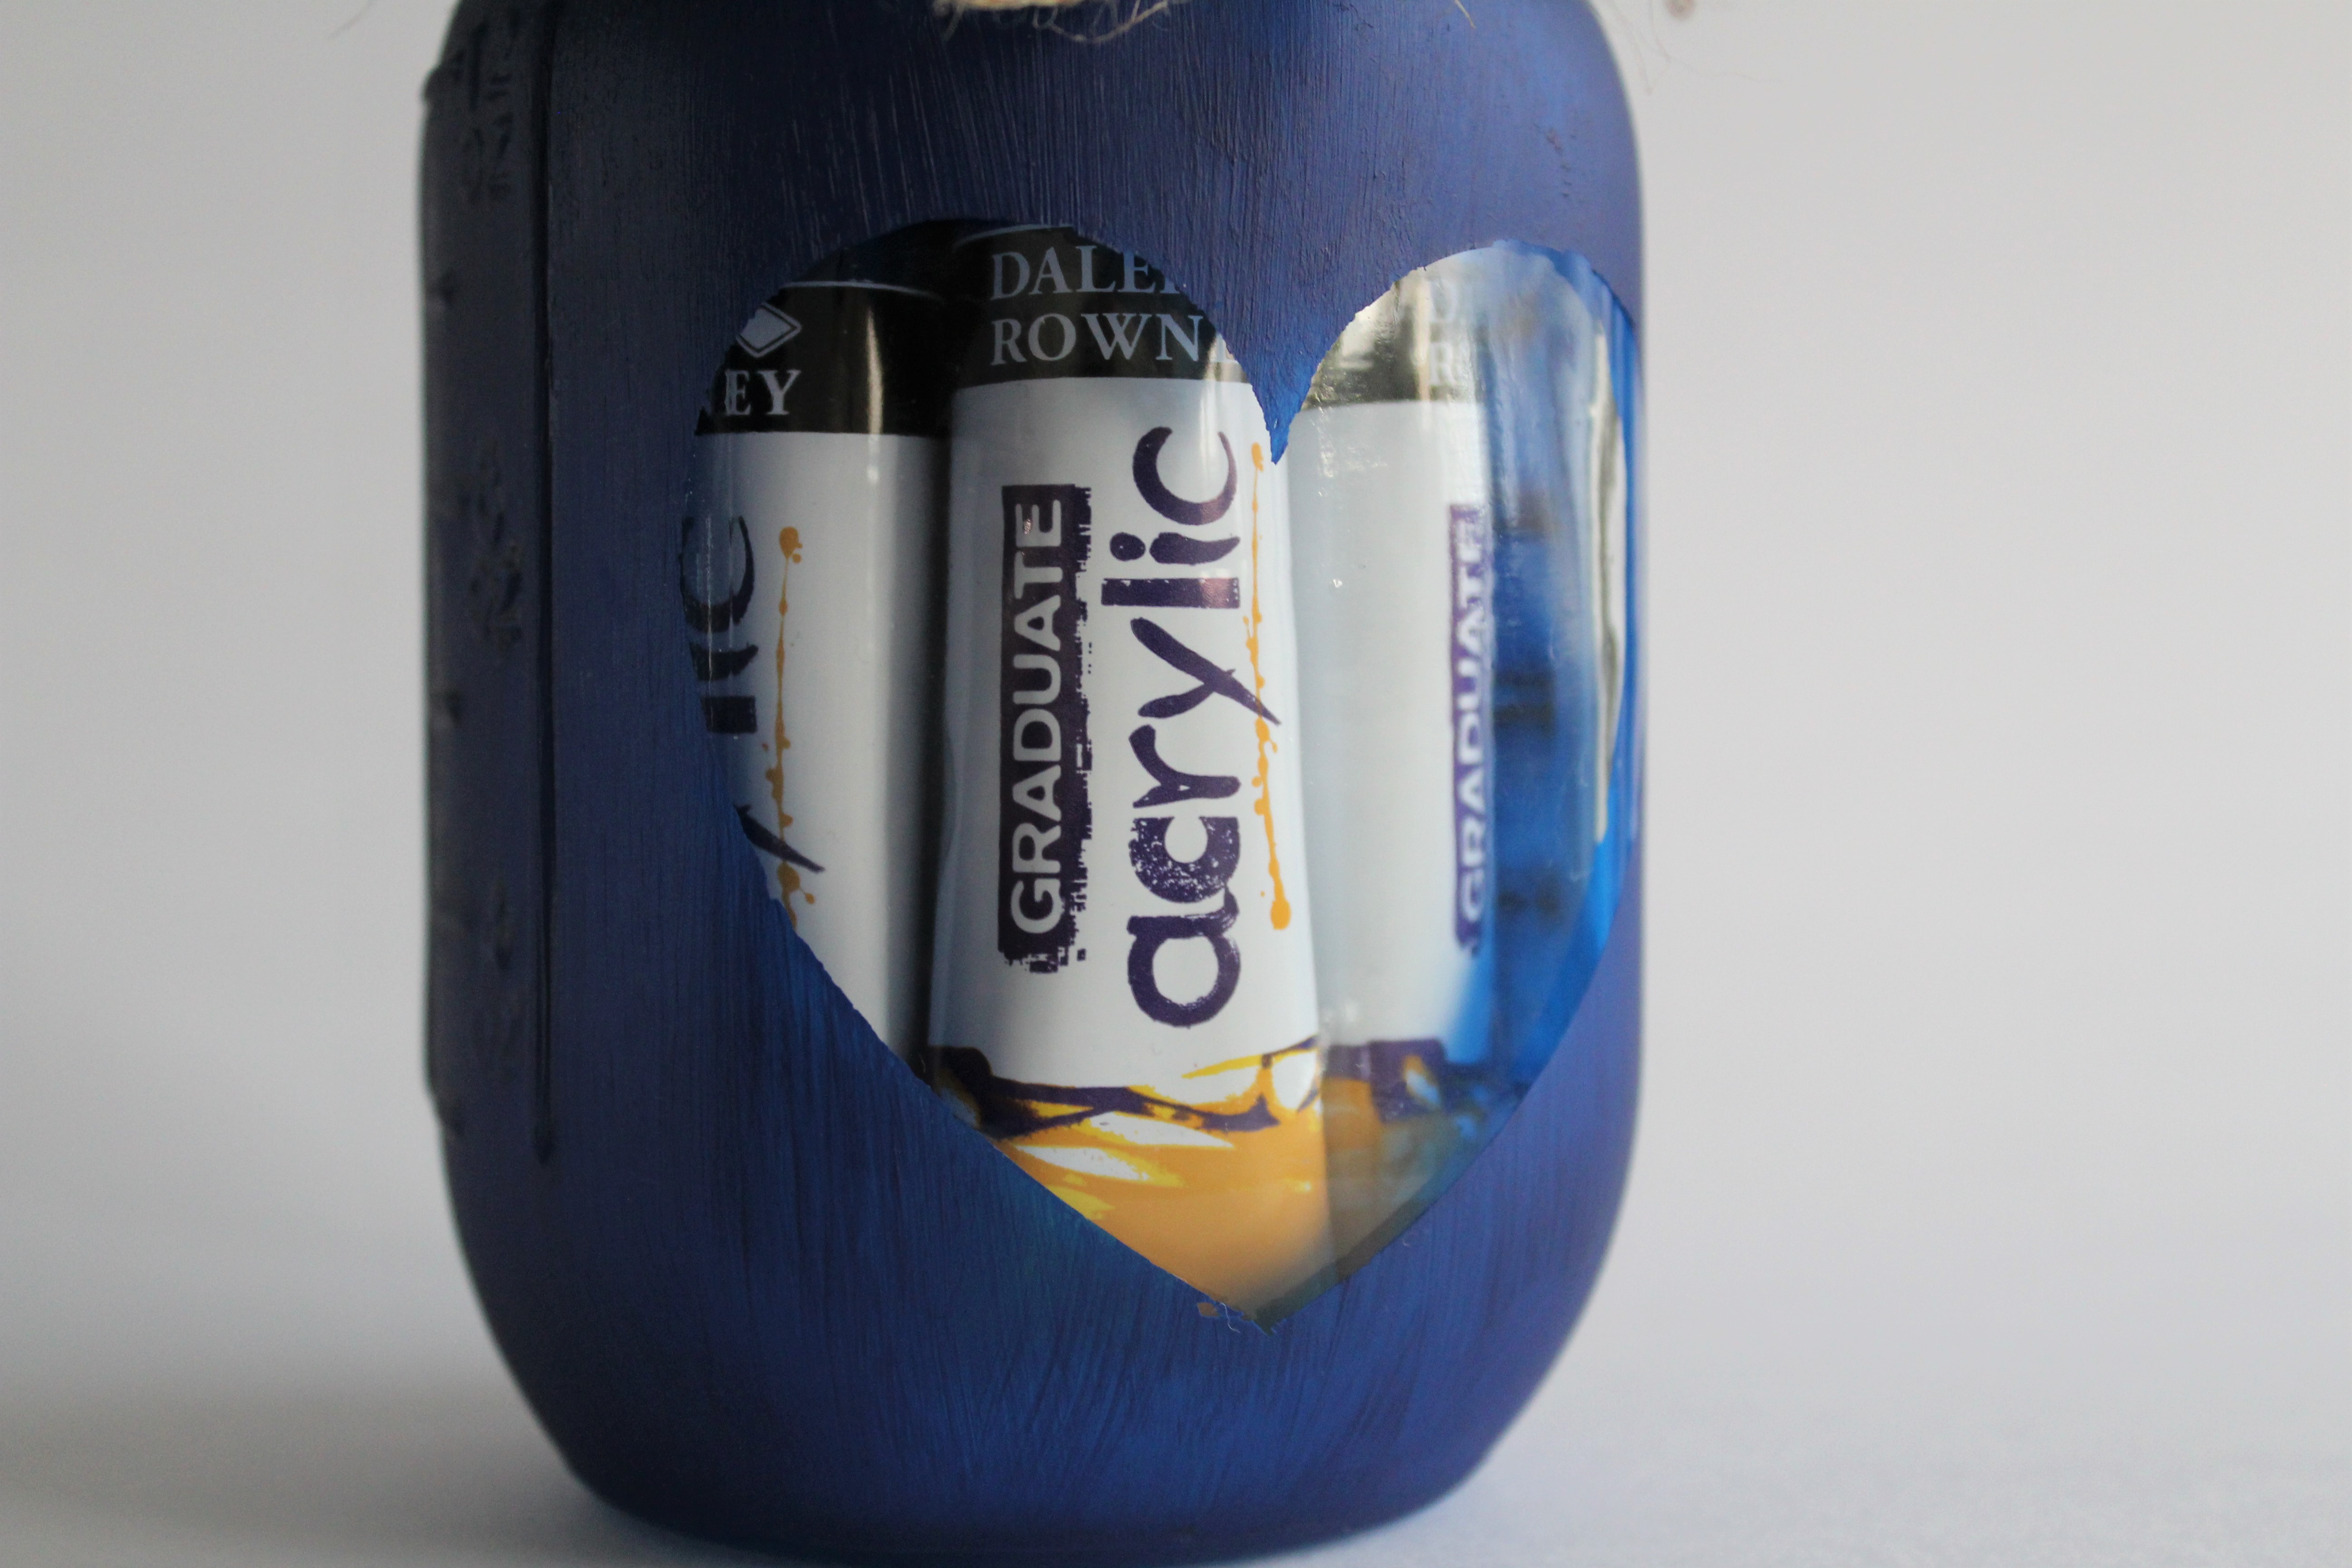
You can decorate the neck of the jar with some ribbon or twine for a cute, rustic finish.

Painted Watermelon Pencil Pot

This is a great craft for kids and grown-ups alike, because it is really simple and you can paint the glass jar however you like and really personalise it. These instructions are for a cute fruity watermelon design, but you can use the same principles to create your own design!
What you will need:
- One glass jar
- Acrylic paint (red, light green, dark green, black, white)
- Paintbrushes of different widths (one very fine if not using paint markers)
- Masking tape or washi tape
- (Optional) Gloss varnish
- (Optional) Paint markers e.g. Posca pens in black and white
The first step to making this cute watermelon pencil pot is using some masking tape or washi tape to create a space between your main red section and the dark green at the bottom of your jar. Apply this all the way around about 1-2cm from the bottom, and make sure that it is pressed down firmly.

Once you are happy with the alignment of the tape, you can start painting! Use red for the main top section, and dark green for the bottom. You may need to apply 2-3 coats for even coverage, so just make sure you leave enough time for each coat to dry.

Once your red and dark green sections are done and dry, carefully remove the tape separating the sections and apply your light green paint in the remaining gap. Again, you will likely need 2-3 coats of paint.
When your base colours are all dry, you can start adding the decorations! Lightly use a pencil to mark out the face before going in with the paints. Then, using either a very fine brush or a paint marker, carefully paint on the eyes and mouth. Once that black layer is dry, you can use white to add shine to the eyes.

After giving the face time to dry, start adding the watermelon seeds. These are just a simple rounded teardrop shape. You may want to start out on the back or side of the jar before doing the seeds on the front, so that you can get the hang of placing them in a way that looks nice.
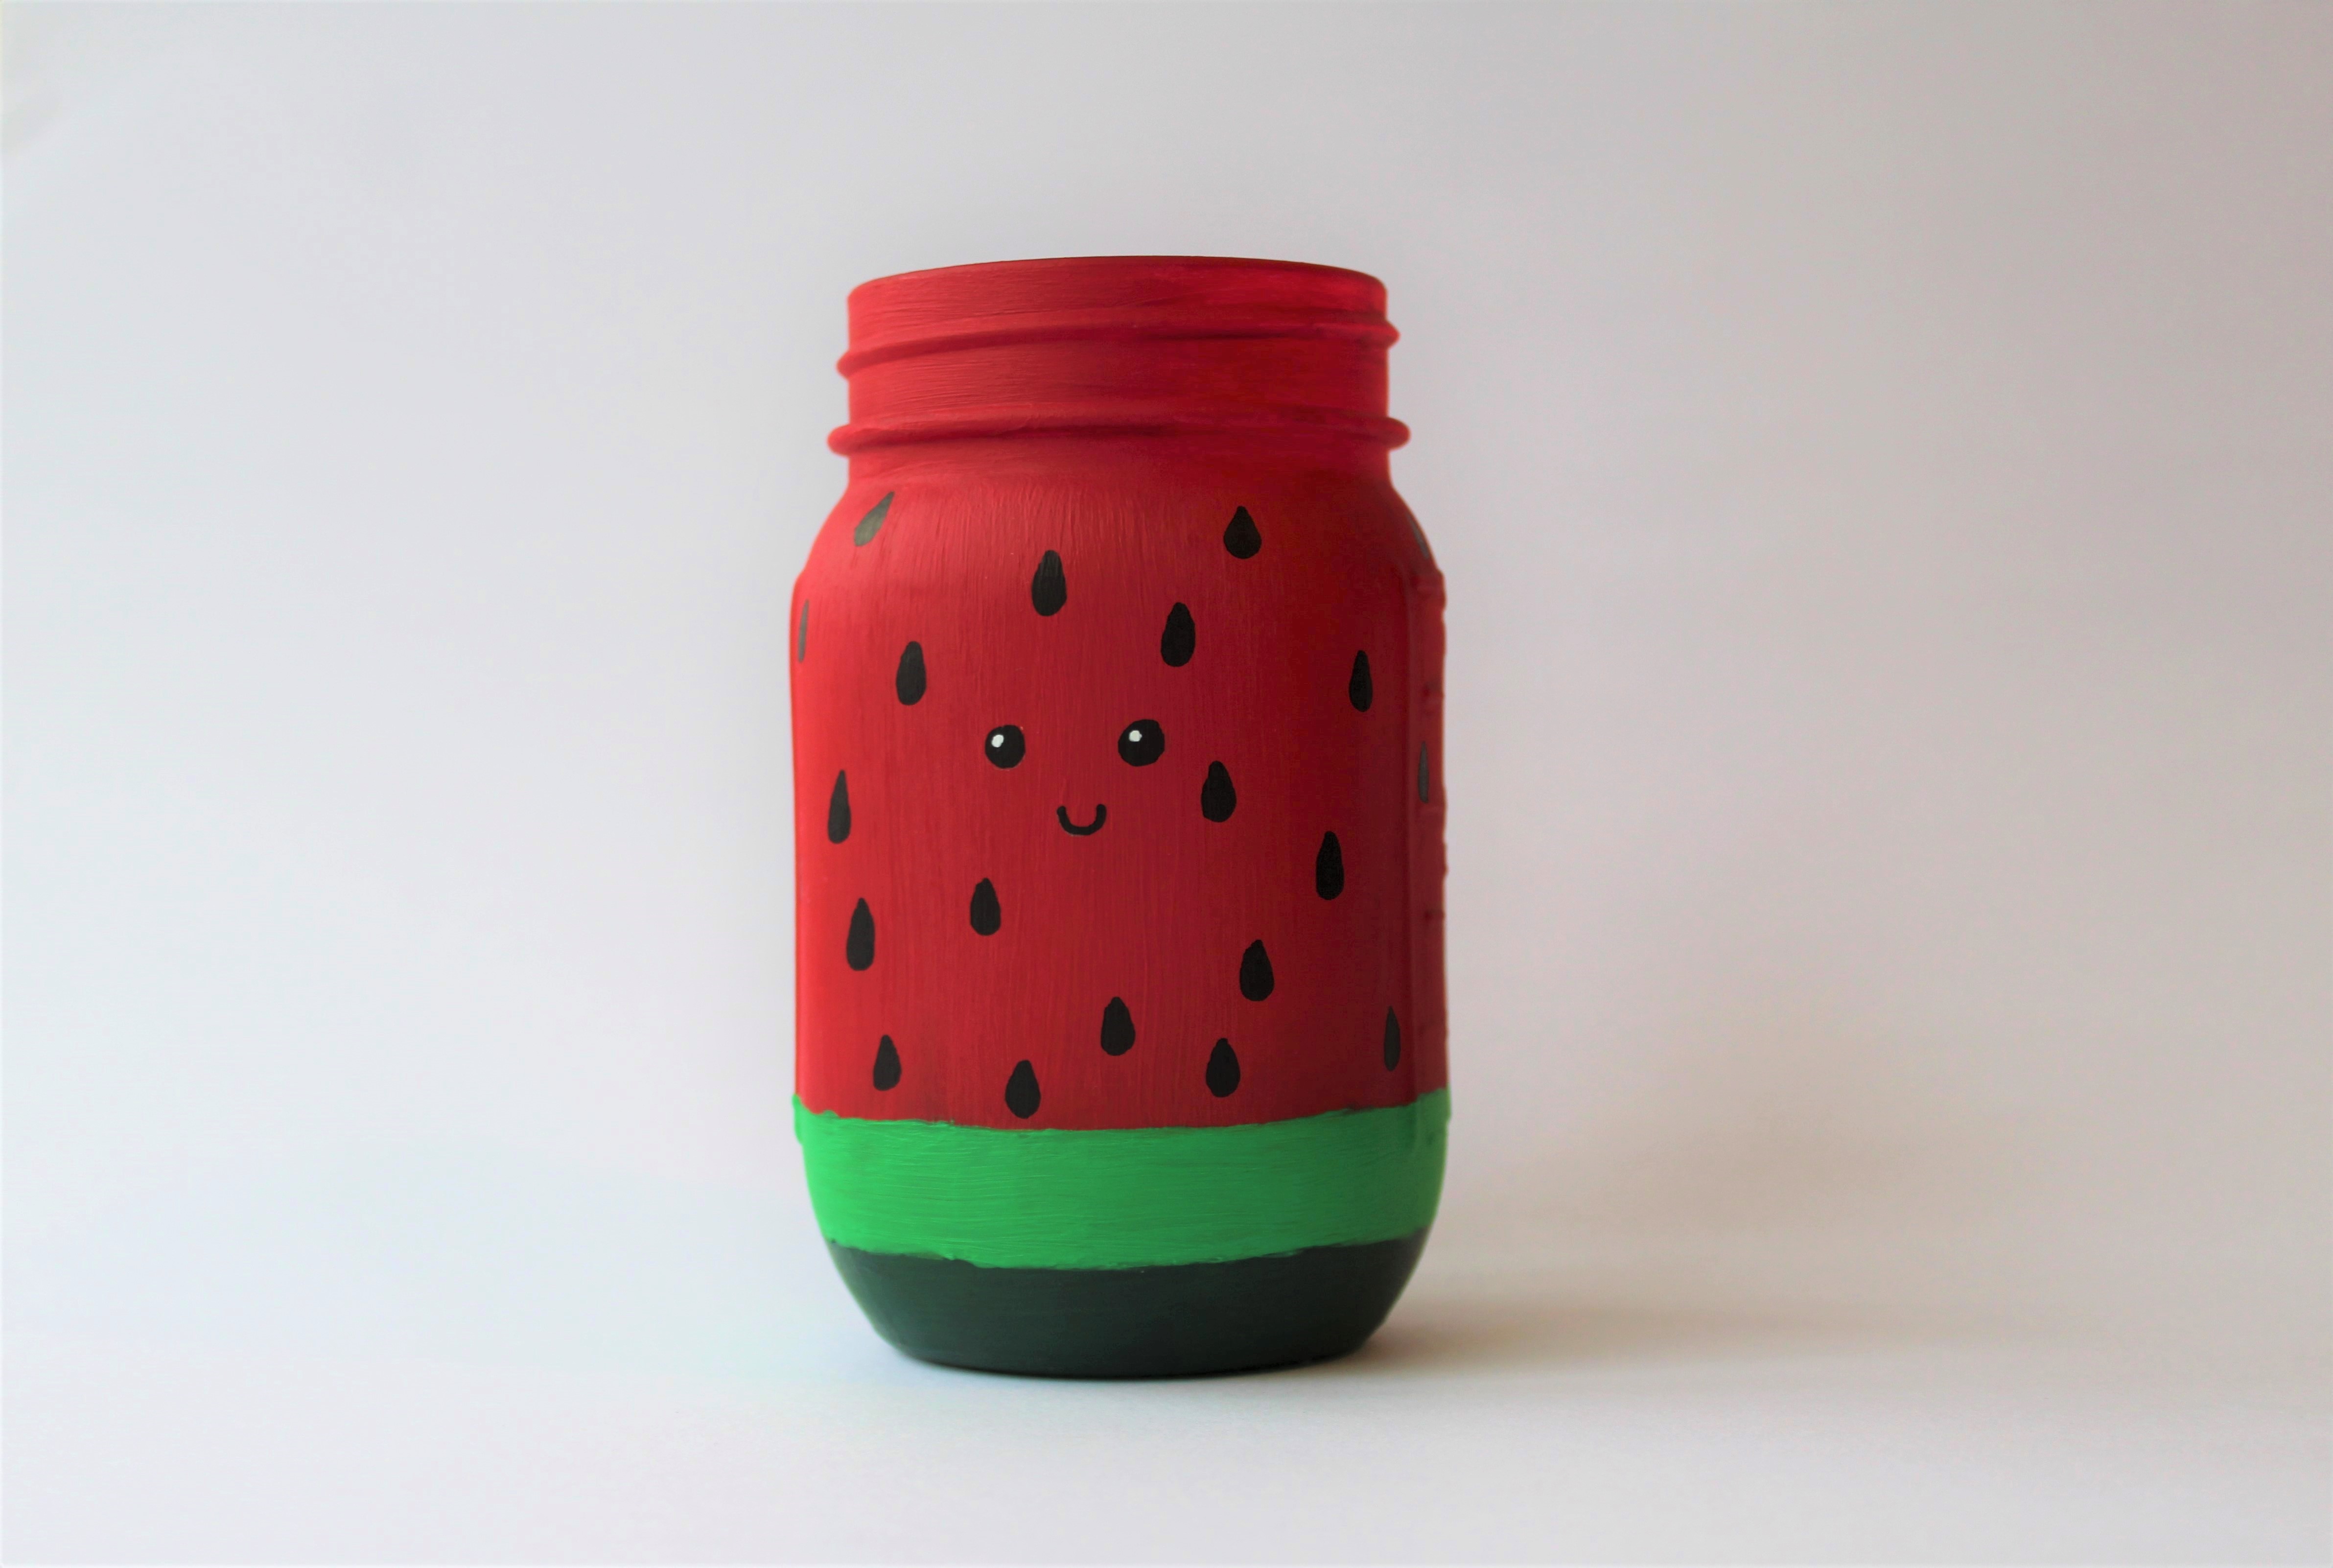
The decoration of your watermelon pencil pot is now complete! If you want to, you can add a layer of gloss varnish for a nice shiny finish.
There are countless things you can make with old glass jars instead of throwing them away (recycling is good but reusing is better!), so hopefully these three craft projects have given you some inspiration. Which one is your favourite? Let us know in the comments below!
Artículo escrito por