Inkscape Tutorial: Couples Personalized Keychain
Personalized Keychains and Couple’s Charms
While keychains may not seem like an overly romantic gift for your loved one, making them personalized adds an extra special touch to an extremely cute and thoughtful gift. A keychain, charm, or bag tag is something that would be carried around every day and seen often while being a matched pair makes it more fun to carry around. Follow along with these steps to create and customize your own.
Personalized keychain: Add your names, initials, anniversary date, or other special message to engrave on the keychain for an extra special gift.

Materials Needed:
- Keychain rings-2
- Jump Rings (or keychain tabs)-2
- Jewelry Pliers (if using jump rings)
- Keychain material:
- Wood- cherry or lighter for a good contrasting engrave
- Solid-color Acrylic- will require paint to make the engraving stand out
- Clear Acrylic- design will need to be mirrored to engrave on the backside, and pain to add extra contrast.
Making your Keychain
Open your vector software and start a new project. For this project, I will be using Inkscape 1.2. Inkscape is a free open-source vector graphic design software.
On the left side margin near the top, there will be a “Create rectangles and squares” icon. Click on the icon and then click and drag your mouse on your artboard to create a rectangle.

On the top of the screen, there will be a toolbar specific to the rectangle you created. “W” and “H” are the width and height of the rectangle, respectively. “Rx” and “Ry” are the horizontal and vertical axis of the corners and adjusting them will create a curved corner rather than a sharp edge. Change these settings to your preference. Rounded corners are ideal for a keychain.
Make sure that you have a stroke color assigned to the shape to function as a cut line. A fill is not necessary since fills are generally read by laser cutting software as engraves. Stroke thickness can be adjusted for better visibility, the thickness of the stroke will not influence the cut of the project in terms of width; the machine will read all strokes as hairline width.
Once you are happy with the shape of your keychain, create a hole to attach your keychain hardware. If you are using jump rings, then a hole as small as 0.09 inches would be sufficient to fit all jump rings. If you’re using keychain tabs, made sure to create a circle large enough to fit your tab. The tabs shown in the photo require a hole of 0.16 inches to fit properly.

Place it near a corner, no closer than 1/8-inch from the edges. If the hole is too close to the edge, then the material holding the ring in place would be weaker and more likely to break. Assign a different stroke color to the circle to separate the inner and outer cuts. To assign a stroke color, while your object is selected, hold down the shift key on your keyboard and click the color of your choice on the color bar near the bottom of the screen. Select all of these elements and group them together so they don’t move.

Duplicate this keychain by either copy and pasting it, or by selecting Edit>Duplicate from the top menu. Position the second keychain so that both keychains appear to be sharing one edge and are centered on each other. You can select both key chains at this time and ungroup them, being careful not to move anything out of place.
Making the Heart
If you would like to create a heart cut-out, then the next step would be the make a heart. While there are several ways you can make the heart, for this tutorial we will focus on the easiest method for making your own.
- On the left side of the screen where the vertical ruler is in place, hover your mouse cursor just on the ruler until the cursor turns from a black arrow to a white arrow. You’ll be able to see a small triangle on the ruler showing the location of the cursor. When this happens, left-click and hold on your mouse. Drag your mouse to the right onto the canvas so that a vertical line appears in the open space. This line is a guideline. It will not affect laser operations, but it will assist us in making a symmetrical heart. At this time, also enable snapping, which is located in the top right corner of the work screen.

- On the left side of the software, where there is a vertical line of icons. Under the spiral icon, there will be one that reads “Draw Bezier curves and straight lines,” as you hover over it. Select that icon.

- Going back to the vertical guideline, click on the guideline with your mouse to add your first point.
- Working either left or right, click horizontally from your first point, then click again on the guideline at a distance from your original point. Then moving up, click on your original point. This should have created something close to a right triangle.
- Back to the icon list on the left side, select the icon near the top that reads “Edit paths by nodes.”

- Using your mouse, click and drag the horizontal and angled edges of your triangle until you’ve created a half-heart to your liking. You can also click on the points (nodes) that you created in order to move them around to your desired shape and further fine-tune the shapes and curves by adjusting the angle of the handles coming from the nodes. To change the type of node, a node toolbar should be present at the top of the screen.

- Once you have achieved your desired shape, click on the top left icon which reads “Select and transform objects.”
- Making sure your half heart is selected, you will duplicate it by either holding down “CTRL” and “d” on your keyboard, or by navigating to the drop-down menus at the upper left corner of the screen, selecting Edit, and then “Duplicate” from the drop-down menu.

- The duplicated object will be directly on top of the original half-heart. Without deselecting it, select the “Flip selected objects horizontally” icon near the top of the screen. The duplicate copy of the heart should flip in place.

- Use your mouse to move the flat edge of the heart half onto the guideline, making sure the nodes meet and snap to the original half.

- With both sides of the heart selected, select “Path” and then “Union” from the drop-down menu.

- Using the Node editing tool, make adjustments to your final heart until you are satisfied. Resize the heart so that it will fit nicely on your keychain.

Heart Cut Out
The next step would be to position your heart along the edges of the keychains that are touching. If your snapping is turned on, then the heart should snap into place along the edge. Place the heart where you want it, making sure to leave enough space to add your Spotify code or any engraved messages.

- Once the heart is where you want it, duplicate the heart using the methods discussed.
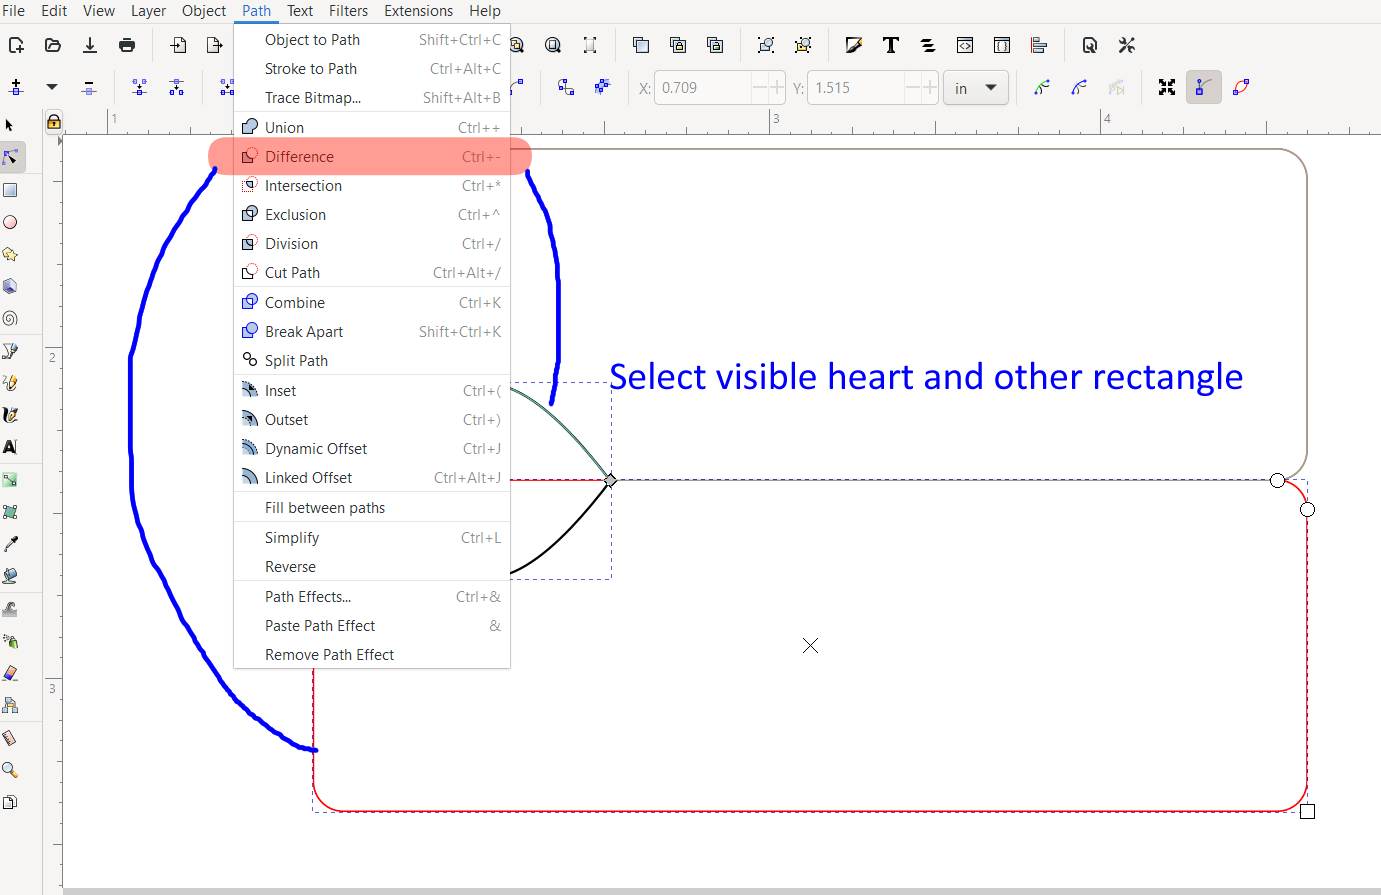
- Select one heart, and one keychain (the outer cut line) and select Path>Difference. If done correctly, it will appear as if nothing has changed.

- Select the remaining heart and other keychain and select Path>Difference.
 At this point, both halves of the keychain should have the heart cut out from their respective sides. If this did not happen, follow these troubleshooting guidelines:
- Please make sure that your keychain was ungrouped completely or alternatively, select the outer edge and the heart by using the node editing tool and holding down shift, and clicking only those parts.
- If the keychain border has disappeared, then undo the action by holding CTRL Z or selecting Edit>Undo. Then select only the hearts, select Object>Raise to Top, and then repeat the above Step 2 from the beginning.

Add Your Text
To add your special message, find the text tool on the left side icon bar. Pick your favorite font and add your text. You’ll need to convert your text to an object using Path>Object to Path. Save your file and open your laser cutting software.

Send to Your Laser
Set the engraves, inner cuts, and outer cuts, and run the laser.
Assemble and Test

Finish off your project by adding your keychain hardware of choice.
Did you make this project? How did it turn out? Do you have any suggestions to simplify the process for others? I hope this project becomes a memorable gift to share with others.
Cet article a été écrit par


