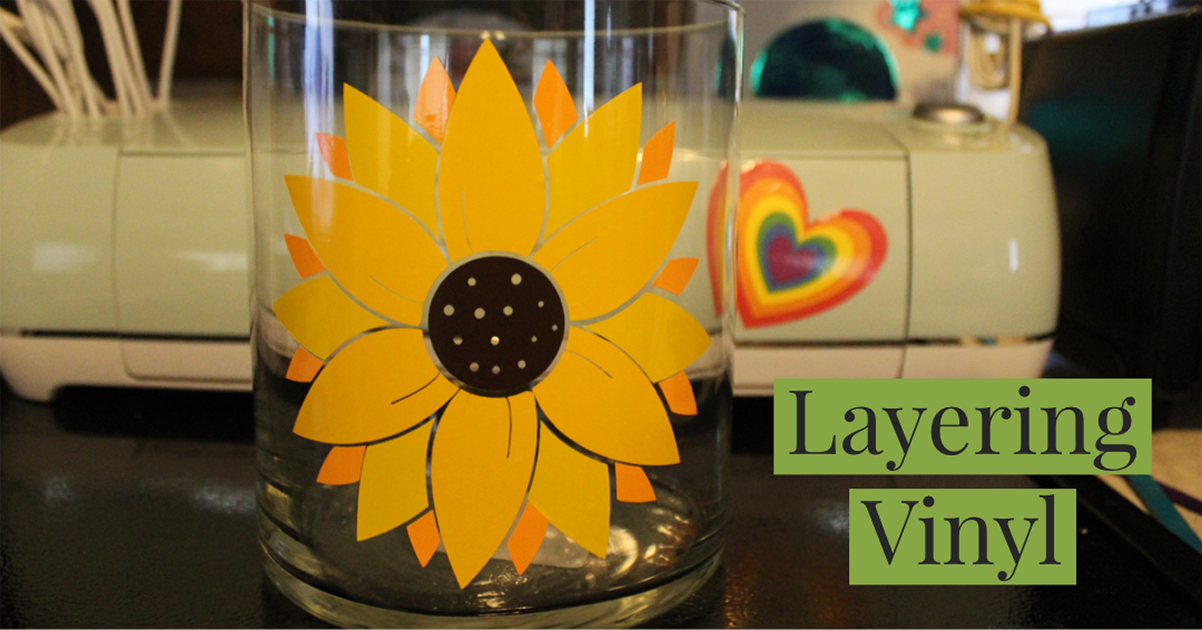
Layering vinyl doesn’t have to be hard! We’re going to use this easy to follow trick today to turn a single layer image into a colorful multi-layer one.

- The Digital File You’re Cutting Out: Sunflower Svg, Floral Svg Graphic by SmmrDesign · Creative Fabrica
- Vinyl: We’re using three shades of yellow and one shade of dark brown
- Glass Vase: for this project we’re using one that’s seven inches tall. Remember when choosing your vase that it’s harder to work with the vinyl on surfaces that are too curved or rounded.
- Cutting Device: Any Cricut or other brand cutting machine.
- Weeding Tools: weeding is removing the excess material from around the design you cut into your vinyl. You can use specific weeding tools if you have them, or any sewing needles or seam ripper work well too.
- Flat scraper tool: It’s used to press the vinyl down and help it adhere. If you don’t have one an old gift card or credit card work well too.
- Transfer Tape
- Scissors
Be sure to read the full instructions before you begin.

Upload your image into Design Space and save it as a cut file. Once you have the image open, scale it to the size you need. For this seven inch vase we’ll make the sunflower five and a half inches tall.
The next step is to create a guide to help keep all of the different layers lined up. Open the shapes menu and select a diamond. Other shapes work as well, but I’ve found that everything stays just a little better aligned this way. Make the diamond roughly an inch tall and place it in the upper left hand corner next to and slightly to the side of the sunflower. Click and drag over both to select them at the same time. Use the weld tool to combine them into one layer together. This becomes your “master shape” that you’ll use to duplicate and create the different colored layers from.
For this sunflower we’re using three shades of yellow and one dark brown for the canter, so we’ll need to duplicate the master shape four times. Select the first duplicated layer and use the color select box to change the layer color to a dark yellow (The color select box is a solid color square button located next to the operation selection button). With the dark yellow layer still selected open the contour window. Contouring allows you to choose which parts of any object are visible on that layer. Select the diamond shape and any petals that you’d like to be the same color, for this sunflower dark yellow will be all of the smallest petals on the outside edge. Repeat changing the color and contouring for each different layer, making sure you keep the guide shape visible each time. Be sure to save your progress periodically.
Once you have each colored layer contoured check your design by laying the diamond shapes up on top of each other, making sure all of the edges line up. If everything was done correctly the design should look pretty much perfect, with each colored layer spaced appropriately and only the diamond from the top layer visible. Check your work next to the master shape to be sure you haven’t overlooked anything. Once you feel like the spacing on the layered design matches the master shape you can delete it.
When you’re happy with your design click the make it button. Follow your machines instructions on what order to cut your colored vinyl in. Place your vinyl on a blue or green cutting mat and load it into your machine. Set your machine to cut your choice of vinyl and make your cuts like normal. Remove your mat when finished and remove your vinyl piece.
After all the different colors have been cut, beginning at one corner weed the excess vinyl from around your shapes, including the diamond. Be incredibly careful not to move it while you’re weeding each one. Leave them still stuck to the transfer backing they come on. Cut a piece of transfer tape that’s just a bit bigger than your design and the diamond shapes. Lay the cut piece of transfer tape on the very top layer, in this instance the center of the sunflower. Use the scraper tool to get a good adherence of the vinyl to the transfer sheet. Being incredibly careful, peel the paper backing away from ONLY the diamond shape and cut it off. The rest of the design should still be protected by the paper to prevent any part of it from getting stuck prematurely. Set the next layer down in front of you and very carefully line up the diamonds. When you’re happy with the placement of the second layer, remove the paper backing that’s been protecting the top layer and use the scraper tool to adhere the second layer to the design attached to the transfer sheet. Again, carefully remove the paper backing from only the part under the diamond shapes and cut it away. Repeat using the diamonds to line up the third layer and adhere it to the transfer sheet with the top two layers attached.
Finish the design by repeating the steps to add the fourth layer. Once the final layer is added the diamond shapes are no longer needed, so you can use your scissors to cut them away from the finished design. Leave the paper protecting the sticky side of the design and use the scraper tool one more time to get the different layers pressed together on the transfer sheet.

Set your vase in front of you and decide where you’d like the sunflower placed. When you’re happy with where you’d like your design, slowly remove the last paper backing. Touching only the transfer sheet, and not the exposed sticky side of the vinyl, place your design where you’d like it to be on the vase. Use the scraper tool to press the vinyl and adhere it to the glass. Then slowly and carefully peel back the transfer sheet, leaving the finished vinyl design behind.

It’s that easy to get beautiful results layering vinyl every time! If you used this method to make something I’d love to see it, share your results here SaraLux | Facebook on my page or comment under this article and let me know what you thought! Happy crafting!
Dit artikel is geschreven door