
I am the first one to admit that when I first started my Cricut journey, I was very intimidated to even attempt to make my own earrings. Turns out, I wasn’t alone. Today, I am here to tell you that there really is nothing to fear! This beginner faux leather earring project will leave you pleasantly surprised and wondering why you were so nervous to try it in the first place!
Supplies Needed
- Cricut faux leather (or other)
- E6000 adhesive glue
- Toothpicks
- Earring findings (fishhook findings & “O” rings)
- Embellishments (rhinestones, gems – optional)
- Tweezers (optional)
- Jewelry pliers
- Digital products: Floral Earrings Template
- Cricut cutting machine (or other)
- Standard grip mat
Let’s Get Started!
Cricut Design Space
To start this project off, grab all of your supplies and create an organized work area on your crafting table. If you have a fairly large supply of findings and gem/rhinestones, it may help to sort them out by sizes beforehand. Doing so will help you with future projects as well, and once you finish this one I am sure you’ll be hooked! 😍
Once you’re set up and ready to go, head over to Creative Fabrica and download Floral Earrings template. I love these earring templates, so much so that I previously used them in my “Make Your Own Jewelry Pendant using Paper” tutorial! The SVG’s are easy to cut with both the Maker and the Explore Air 2, and their unique design makes them versatile for a multitude of projects.
Once you have downloaded and extracted the files, open up a new canvas in Design Space.
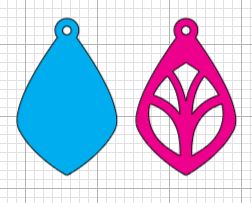
The hardest part of this project is deciding which template you want to use! I decided to go with earring number 4 because I wanted something that was nature-inspired and this one reminds me of a tree. Whichever template you decide to make, make sure that you also grab the solid shape SVG as well for the backing. Don’t feel restricted to only make one! Feel free to create all five designs if you want to – this tutorial can be applied to any earring type in the bundle!
Now all you have to do is size them. I like the size that they are uploaded, but if you like, you can make them bigger or smaller. Do you want large flashy earrings, or quaint and simple? That’s part of the fun of making your own jewelry, you really can customize your accessories to your own unique tastes.
Preparing for the Cut
Once you have your size set, duplicate both pieces so that you have a pair. Now it’s time to cut! When choosing your faux leather, you may want to go with two different colors to create a contrast from the design of the earring against the backing. Because I wanted my earrings to have an earthy / autumn tone, I decided to go with Cricut’s “cafe” and “copper” colors.

You can go right ahead and click on the “Make It” button, but your pieces will be cut on separate mats. I am all about time-saving, so before sending it to cut, put a little distance between the front and backing, then select all four pieces and attach. This will make the Cricut think it is cutting the same colors, but we can manually change that on the mat.

Simply take note of the backing location on the mat, as well as the front design, and place your faux leather pieces accordingly. Remember to make sure you use a standard grip mat and that you place the faux leather face down!
When you are prompted to choose your material, search for “Faux Leather Paper Thin” if you are using Cricut brand faux leather. If not, you may need to do a little research for your particular material, however, I have had many great cuts using the “Felt, Wool Bonded” for some of the thicker faux leather sheets that I have ordered off of Amazon.
- 👉 Cutting Tip: I almost always choose more pressure to cut faux leather. I find that this helps to create a perfect edge, which is important when making jewelry!
Glue and Embellish
Now that you have all four sections cut out (or more if you are making more than one pair) grab your E6000 glue and head over to your crafting table. If you have a special syringe for applying glue to small items, then go ahead and prepare it as per usual. I don’t have one so instead, I put a small dollop of glue on a piece of scrap paper and use a toothpick to apply it.

I find that applying the glue in this manner gives you more control over the amount of glue that you use, which means no excess glue to clean up on the earrings afterward! Again, I am all about time-saving! 😉
If the earrings are slightly curled, you can allow them to dry under a book to help flatten them out, but I kind of like a slight curl, so I only left mine under a book for about 10 minutes.
Once they are dry, you can use some gems or rhinestones to embellish them. Again, using your glue toothpick, add a tiny droplet of glue to the gem and apply it to the earring. Use some tweezers to help you hold onto the tiny gems if you need to.

This step is completely optional of course!
Let everything thoroughly dry before moving on to the next step.
Findings and Finish
All that is left to do now is to add the findings! Open your “O” rings with the pliers and attach them to the opening at the top of your earrings.

Before closing, add on your fishhook finding and then secure them with the pliers. That’s all there is to it! You now have a pair of unique handmade earrings that are sure to bring you some much-deserved compliments! See? Easy as pie! 👌😊
Keep on Crafting! 💖
Dit artikel is geschreven door


