Easy DIY living room décor using your Cricut or Cameo

Customizing and decorating your living room has never been easier or more fun. With your vinyl cut machine you can craft your living room into a beautiful personal space. Use your Cricut or Cameo Silhouette to create customized one-of-a-kind creations to turn an ordinary living space into your dream room.

Coffee Table Trays
Coffee tables (or drink tables) were traditionally used for serving after dinner drinks when socializing. Now, this short table has evolved to be a sort of catch-all in the living room space. People work, eat, read and do everything on a coffee table. If you don’t want to add vinyl to your table but still want to give it a personal touch try setting up a drink tray. Using a simple wood tray add designs of leaves or greenery around it to give it an organic feel.
What you need for this project
- A Coffee Tray
- Permanent Vinyl
Project Instructions
Using your cut machine choose a simple design that you can easily peel and stick to the wood surface of your tray. Measure the amount of vinyl you will need and create the design of your choice. Carefully lay the vinyl cut-outs into the shape or design of your choosing. Use Mod Podge to go over the design with a clear coating to protect the surface from use.

Baskets or organization bins
The best way to keep storage in your living room space is to have designated areas for each craft or hobby (or toys if you have kids!) Label your bins and baskets with crafty texts that matches your style to keep things neat and tidy.
What you need for this project
- Baskets or any organization bins or boxes
- Permanent Vinyl
Project Instructions
To organize your living room choose compartment bins that match your style. Customize them by adding the names to the contents of each bin with script or block font. (Example TOYS or BOOKS.) Using Cricut Design Space or another program to create the font text you would like to use. Measure your bin for space. Cut your vinyl and place your permanent vinyl on your bins or organized tubs.
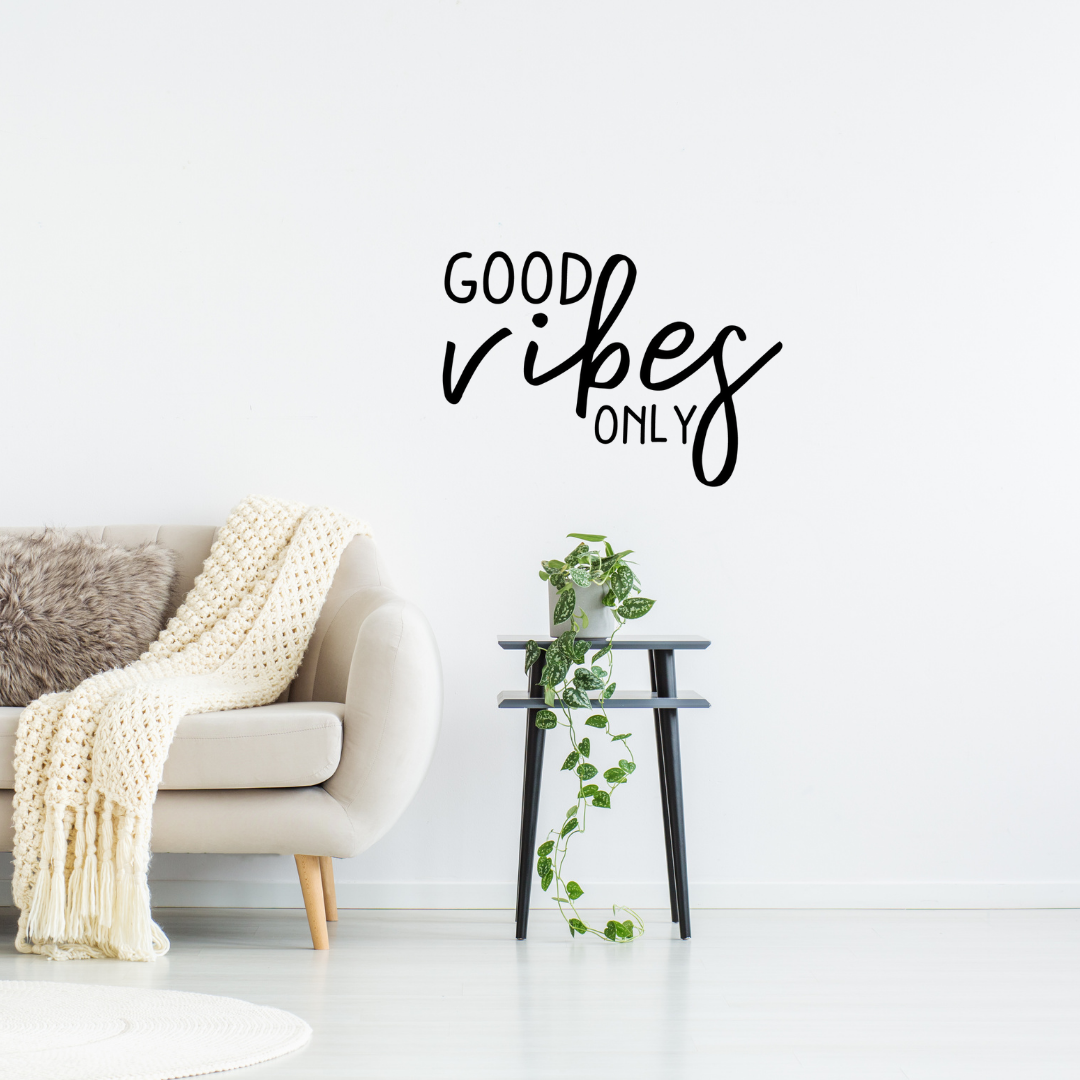
Wall Decals
Wall decals are a great way to add inspirational quotes with simple messages to your living room walls. For this project use regular permanent vinyl and create a wall decal. Options include using colored vinyl to create a message that pops, or simple images like butterfly silhouettes to create something eye-catching in an otherwise large empty space.
What you need for this project
- Permanent Vinyl
Project Instructions
Create or choose an SVG that you would like to make into a wall decal. Measure your space and cut the quote of your choosing. Make sure your wall is clean, any dirt left will cause the vinyl to become unstuck over time. Use a level to adhere to your wall space to make sure your letters are straight. Stick vinyl to your wall.

Frames
Simple frames can be used to brighten up a living room. To create these simple framed quotes, frame a plain clean white piece of paper. Create or download a quote. Cut your permanent vinyl out and place the message on the outside of the glass on your frame for a slight 3D effect.
What you need for this project
- Frames of your choosing
- White paper large enough (or small) to fit in frames
- Permanent Vinyl
Project Instructions
For this project open your frame and place the white sheet of paper inside and secure closed. Choose your quote and cut making sure to check all your measurements so that your vinyl will fit on the frame. Stick letters to the outside of the frame for textured effect.

Wall Gallery
What I love most about a wall gallery is that it does not have to be perfect. Create something with meaning by mixing up personal photos, quotes, and even shadow boxes of memorabilia.
What you need for this project
- Frames
- Art
- Shadowboxes (optional)
Project Instructions
Use your Cricut or Cameo Silhouette to make framed letter art, or simple images like leaves or flowers. Add in your personal touches with mismatched frames (bonus if they are thrifted) and hang them not in a line but scattered. Place some frames horizontal and some frames vertical. To keep your wall gallery from looking out of balance measure the distance between each frame and distance all your frames apart from each other equally. This creates a cohesive look that makes a great DIY piece when all placed together.

Candles
Customize your plain candles with monograms, letter art or simple images according to your personal style. The example image has just black boxed letters, but this is a great place to get creative even if you have a more minimalist style. Experiment with color in small spaces like by adding different colored vinyl.
What you need for this project
- Candles in glass
- Permanent Vinyl
Project Instructions
Choose your design making sure that the design is small enough to fit on your glass candleholders. Use permanent adhesive and place the sticker side onto the class container of your candle for a customized look.
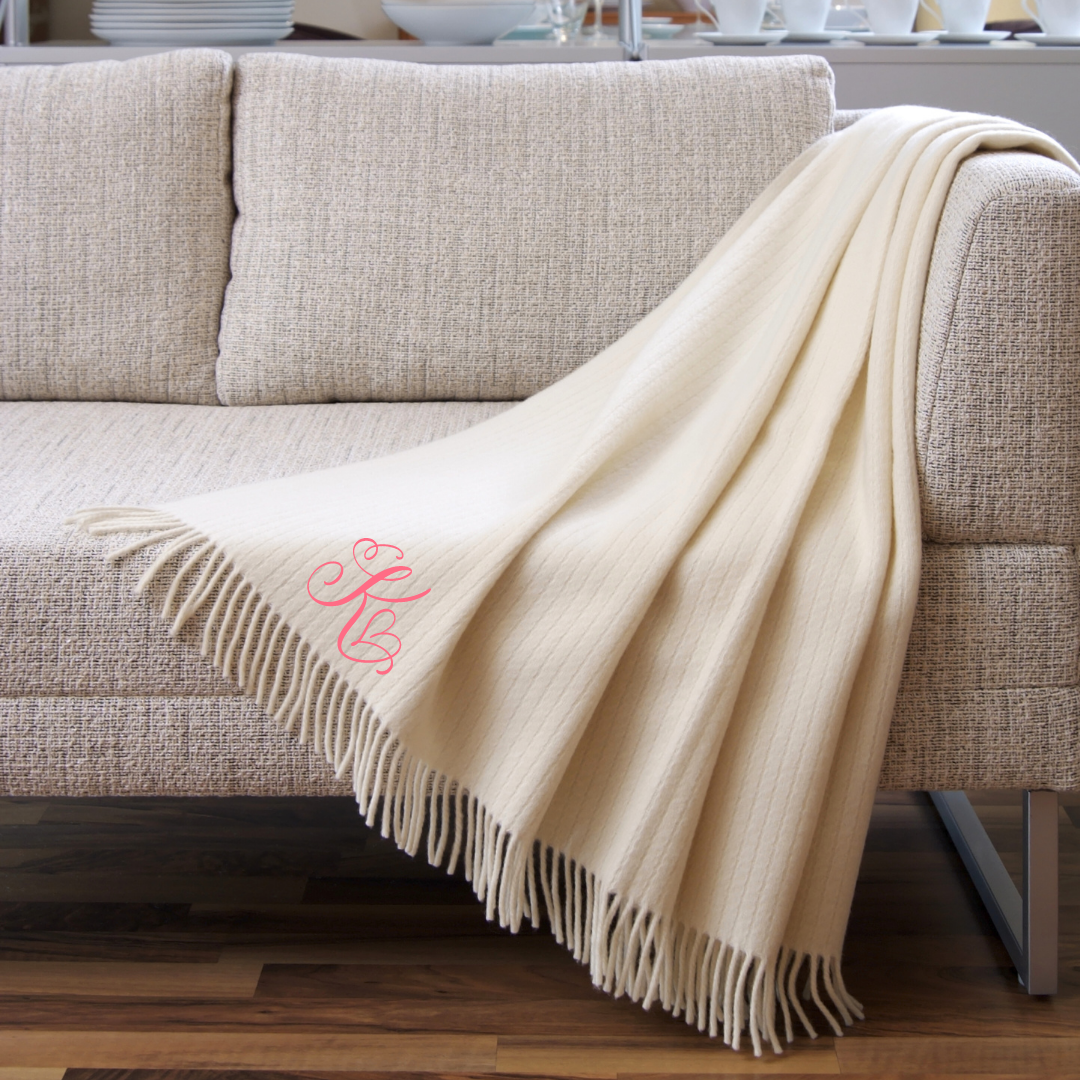
Monogrammed Blankets
Blankets are always a cozy look in any living room. Customize yours by giving them a pretty monogram on the corner edge. Use interlocking letters to create a monogram with your initials. For this project create your monogram with heat-transfer vinyl. Be careful with the fabric of your choice of blankets. Heavy knits will not work well but fleece or any kind of fabric would be perfect.
What you need for this project
- Heat Transfer Vinyl
- A Blanket
Project Instructions
Using your cut machine choose a simple design or monogram with your initials. You can search free monogram frame makers to help you create one for free. Once you have your design upload it to your Cricut Design Space or the program of your choice. Remember to reverse your design before cutting and cut with the clear side of the heat transfer vinyl down or the end result will be backwards. Cut out your design and using an iron or a heat press, press your design on a heatproof surface. Press and peel off the clear transfer.

Reverse Canvas
Reverse canvas prints are a super fun way to customize a large space on a budget. Pick up any blank canvas from a store as large as the area you need it to be. Create framed quotes, silhouettes or letter art using the reverse canvas technique and heat-transfer vinyl.
What you need for this project
- Canvas
- Paint
- Heat Transfer Vinyl
Project instructions
Carefully remove the staples from the canvas with pliers. Peel off the loose canvas cloth and separate from the frame inside. Paint the frame a color of your choosing. Next using your cut machine to cut out your design remembering to reverse the design before you cut. Place onto a heatproof surface and using an iron or heat press, press your vinyl onto the canvas. Measure the frame once it has dried and trim off the edges of the canvas you don’t need. Staple or carefully nail the finished canvas front facing to the backside of your frame. When you flip it over you will see the painted frame and the finished design of your canvas.

Canvas
This is another wall art option. If you don’t want to reverse your canvas you can turn your cut-out into a stencil and omit the part where you have to remove the staple and paint the frame.
What you need for this project
- Canvas
- Card Stock
- Paint (color of your choosing)
Project instructions
Find the quote or SVG you would like to use for this project. Upload to your program and cut on your card stock. Once your design is cut, peel the inside of the outline out of your design so only a stencil-look is left. Place your newly created stencil on top of your canvas and with a small paint sponge dab your letters with paint until filled. Slowly remove the stencil and let your design dry.

Coasters
Another way to spice up your end or coffee tables is to add personalized coasters. In the photo I used floral designs, but this is a great place to get creative. Add funny quotes, monograms, or succulent designs, be creative!
What you need for this project
- Coasters
- Permanent Vinyl
Project instructions
To create your coasters choose a design that you can easily peel and stick. Cut out carefully and place your vinyl onto your coasters. Paint your coasters with clear acrylic seals like Mod Podge or Sculpey Glaze. Adding a clear coat will keep the design in place while in use.

Plant Pots
Plants are a really great thing to have in your home. They not only turn up the air quality, but bringing in the greenery can add a nice fresh feeling to a maybe not so colorful space. Plants also go with whatever style of décor you already have, so it’s a win-win. Decorate your plant pots with funny emoji, kawaii faces, quotes, hearts, or anything you can think of.
What you need for this project
- Potted Plants
- Permanent Vinyl
Project instructions
Create cute plant pots by adding permanent vinyl in fun designs. My favorites include emoji’s kawaii faces and fun shapes. Cut and stick your design on your pot with Permanent vinyl. So easy!

Pillows
I love throw pillows. They are a fun way to add holiday decorations or change up the vibe of the room without having to commit to too much overhaul. You can easily customize pillows with sayings or go for bolder designs.
What you need for this project
- Throw Pillow
- Heat Transfer Vinyl
Project instructions
To create throw pillows, choose a word you would like to adhere to your pillow. Cut your design in reverse and peel off the vinyl leaving your design and the clear coat from the heat transfer. Remove the pillow from the pillowcase and set aside. On a heatproof surface press your design on your pillowcase with an iron or heart press. Once cooled enough to touch remove the clear transfer and replace the pillow into your pillowcase and enjoy!
For more fun projects, Cricut ideas and tutorials follow Creative Fabrica’s The Artistry blog. Happy crafting!
Este artigo foi escrito por


