Procreate Tutorial: How to Install Brushes on your iPad
Learn how to grow your creative library.
Read the articleThe items in your cart are not available in the selected currency. Do you want to continue in the selected currency and remove these products from your cart?
Don't switch currency
Discover how to create new shapes and compositions.
Adobe Illustrator allows you to turn simple paths and shapes into elaborated drawings. The software provides some useful tools to help you with this process. Most of these tools are included in the Pathfinder menu.
In today’s post, we are going to explain how to display the Pathfinder menu. We’ll also explain every tool that you can find on this interface. Take this article as a guide and start experimenting with your drawings. We hope you find it useful!
On this article:
How to display the Pathfinder menu
Shape modes: The Unite Tool
Shape modes: The Minus Front Tool
Shape modes: The Intersect Tool
Shape modes: The Exclude Tool
Pathfinders: The Divide Tool
Pathfinders: The Trim Tool
Pathfinders: The Merge Tool
Pathfinders: The Crop Tool
Pathfinders: The Outline Tool
Pathfinders: The Minus Back Tool
For this tutorial, we have started by drawing a simple illustration with some overlapping shapes. Pay attention to the image below: this is the original disposition of the elements. After we use the different tools, the aspect of the fruit and its leaves will change in different ways.

To use the tools of the Pathfinder menu, you need to select every element of your drawing. We recommend you not to group them. The purpose of the exercise is to be able to make them interact and modify each other.
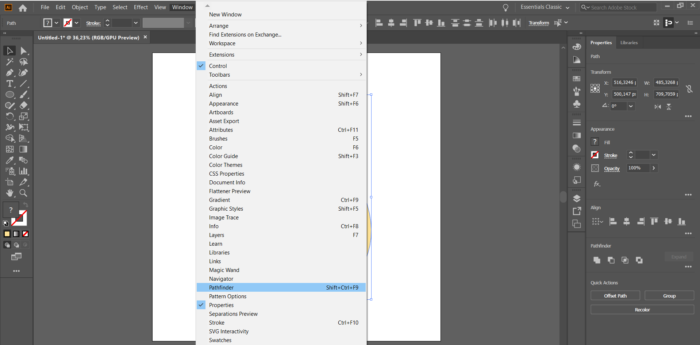
To see the Pathfinder menu, go to Window > Pathfinder. The keyboard shortcut to Pathfinder is SHIFT + CTRL + 9.
The Pathfinder menu should appear on the right side of your screen (where you can find the Properties panel). Otherwise, it will appear as an independent window that you can drag and drop wherever you want.

To see all the options, press the three small dots on the right side. If you hover over the icon with the mouse, you will see the message “More Options.” Click the three dots to see all the tools.

The Pathfinder menu offers two types of tools: Shape Modes and Pathfinders.
Shape Modes allow you to decide how do you want your objects to interact among themselves.
There are four Shape Modes:
Pathfinders make your objects interact to generate new shapes.
There are six Pathfinders:
Let’s explain them with more detail in the next paragraphs. Keep reading to find out more information about each tool.
The Unite Tool turns all the elements from your illustration into one figure. The figure will have the last color you have selected in the swatches panel. After unifying, you will have an element that keeps the features of the original shapes.

You can get the same effect by selecting all the elements and pressing Alt/Option in your keyboard.
The Minus Front tool deletes all the elements that are in front of the illustration. In the case of our example, the shadows and the leaves were in front of the composition. Therefore, by applying the Minus Front tool, we have made these elements disappear.

You will only maintain the elements that were at the back of the composition. In the case of our example, only the main shape of the fruit remains.
The Intersect tool allows you to release the intersection between two figures. In our example, you can see that the parts where the fruit and the shadow don’t collide have disappeared.

When you apply the Intersect tool, the part where both paths collide will remain. The rest of the elements will disappear.
The exclude tool is the opposite of the Intersect tool. It eliminates all the intersections between the two figures.

The areas where both figures collide will disappear. The rest of the figure will remain. On the example above, you can see that now the part that remains is the main shape of the fruit.
The Divide tool separates the illustration in different shapes.

This tool breaks al the anchor points where different objects collide.
The trim tool eliminates the hidden parts of the composition. Everything that you can not see at first sight will disappear from the illustration.

Pay attention to the example of the image above: the Trim tool does not combine same-color objects. As you can see in the picture, they remain independent.
The Merge tool does the same as the Trim tool; it eliminates the hidden parts of the composition. The difference between both devices is that the Merge tool combines same-color objects.

Look at the image: the square and the fruit are now part of the same element.
The Crop tool eliminates all the parts of the illustration that are outside the front object. In the case of our example, as the shadows are in the front, they are the elements that remain.

The remaining objects will have the color that you select before selecting Crop.
This tool divides your object into different segments. As you can see in the picture, the color filling disappears.

After you press Outline, you will only see the outline segments.
The Minus Back tool deletes the objects that are placed in the back. You can only apply this tool with two elements.

As you can see in the example from above, the part of the fruit that was covered by the shadow has disappeared.
We hope you find this tutorial useful. Get inspired and explore all the possibilities of the Pathfinder tool.
Receive a weekly digest that highlights the most popular articles on The Artistry.

Every week we release new premium Graphics for free, some available for a limited time only.
Continue
Get access to 9,209,187 Graphics as part of our Graphics subscription. Check them out now.
Continue
Our discount deals are premium products for just $1. Available for 1 week only, so act fast!
Continue
Learn how to grow your creative library.
Read the article
Learn how to save your work in progress.
Read the article
Learn how to export some unusual file formats.
Read the article
All you need to know to start designing with fonts.
Read the article
Learn the basics of this popular app
Read the article